Intro
You’ve finished your latest edit, started the export and suddenly encountered an export error… maybe for the first time all project long. If you’ve been an editor for a while I’m sure you’ll have encountered this issue at some point. You might even have some of your own tricks to solve it. Well, whether it’s your first time encountering the problem or you’ve exhausted all your own solutions, we’ll run through our top fixes below.
Before we get to some of the more advanced fixes it is important to check the simple things.
- Make sure you have enough disk space on the drive you’re exporting to.
- Make sure the drive you’re exporting to is fast enough so it doesn’t hold up the export. In other words use an SSD and not a slow external 2.5” hard drive.
- Restart your computer. It is an old trope, but seriously. Just give it a restart.
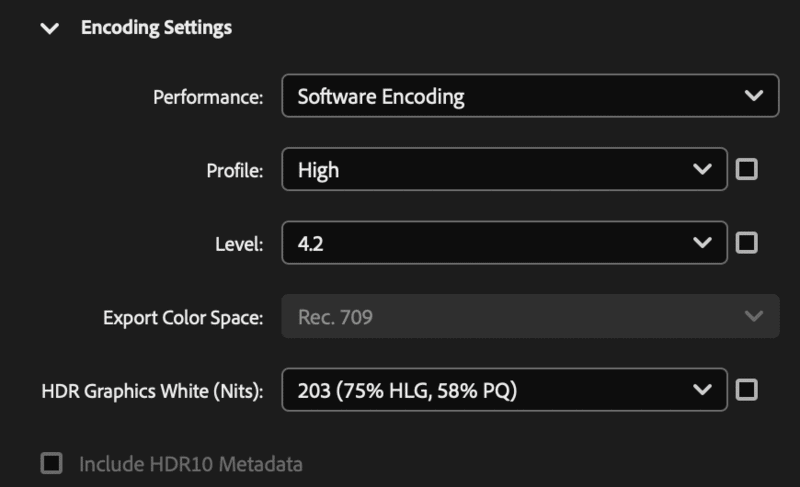
1. Use software encoding
If you have the time (at a guess I’d say this takes 4x to 5x as long to export) then you can use software encoding to do your export. I often find waiting longer for the export to complete using software encoding is faster than trouble shooting the issue with the other options. This is especially true if the video duration is less than 5 minutes.
This option can be found under encoding settings in Media Encoder and in the video drop of the export window in the Premiere Pro:

2. Render out After Effect dynamic Links
Using dynamic like can be a real time saver when you know you’re going to need to adjust timings, but they can cause issues with exports.
Pop back into AE, export the completed sequences as ProRes 422 or DNxHR HQX. If the sequence requires it, then use 4444 with an alpha layer.
Bring the exports back into Premiere Pro. I like to right click on the dynamic link asset and untick “enable” and put the new export above it. This will leave your dynamic link there which can be useful.
3. Render timeline in-to-out
Before we do this:
1. Duplicate your sequence.
2. Go to Sequence Settings.
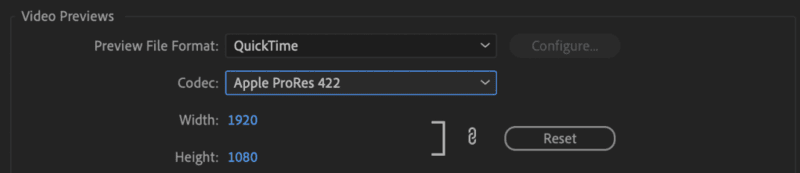
3. Adjust Render Previews to ProRes 422.
Now render your timeline using “render in to out” and see if you can identify the shot that is causing issues.
If the render in-to-out fails it will usually render your timeline up until the clip that caused the problem. Once you know what clip is the problem you can try to solve it. This could be by re-encoding it using Media Encoder or Handbrake.
4. Render timeline in-to-out, option 2
If you can have rendered in-to-out and there were no issues (green line above timeline) then you can use those render preview files in the export.
Go to your export window. Match your export video settings to your render preview settings. These need to match exactly. So the same resolution, framerate and codec (ProRes 422 if you’re following along with this tutorial)
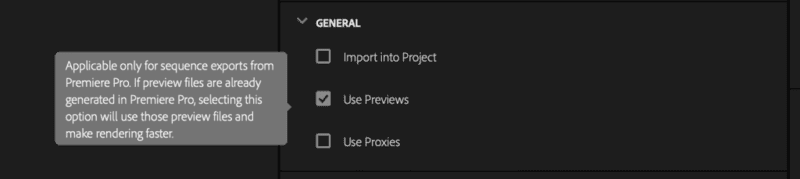
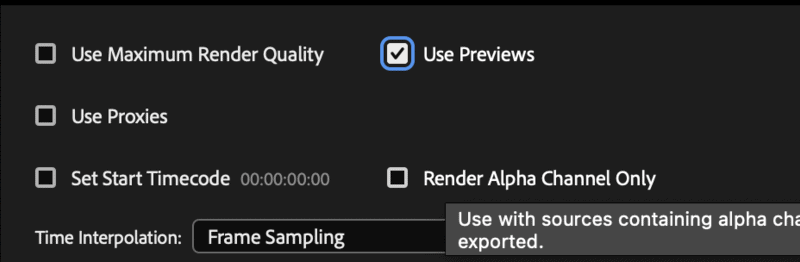
Then tick the “Use Previews” box. This can be found under the “General” Tab in Premiere Pro or at the bottom of the export settings window in Media Encoder.
If you need a H264 or H265 video for online upload, then re-encode the ProRes Using Media Encoder. This adds an extra step but the ProRes export should be really quick.
5. Other issues you might have that are causing issues.
If none of these options worked to immediately solve you issue then you could look at these:
- Update your GPU Driver, especially if it has been a long time since it was last updated.
- Remove old/outdated 3rd party plugins. Begin first by removing the plugin from any clips in your timeline. If that fixes the issue then consider removing the plugin completely.
- Make sure there are no VFR (variable frame rate) clips. These are commonly found in Gameplay footage.If you do, reencode them using HardBrake.
Conclusion
If you’ve got any great solutions to this problem that we haven’t included here then let us know!